know immediately that you’re using iOS 7, right from its initial greeting: Slide to configure iOS 7.
You’ll need to click through the following setup screens:
A. Choose a language.
Note; if you are setting up a iPad or iPod touch your device Will want to be connected to a form of Wi-Fi. Make sure you have the password to your wi-Fi available. Since it will ask you to connect to the Internet. This is important because this is where it's going to collect all the data and make sure it is up to date.
B. Choose if You Would like Location Services, on or off. Location Services allows location-based apps and websites (including Maps, Camera, Safari, and other Apple and third-party apps) to use information from cellular, Wi-Fi, Global Positioning System (GPS) networks, and iBeaconsto determine your approximate location.
NOTE; If you choose Not to turn on location services at this tine. You can always do it later.
Note; You can always choose to SkipThis step. There is a button that says skip. If you choose to skip this step you can always log into iCloud after you were done sitting up your device. I find that doing this is much easier.
If you are doing a iPhone it will ask you to turn on find my iPhone. This is an option.
Add a passcode to keep prying eyes away from your data. Note; When you upgraded your iPhone or iPad to iOS 7, you were asked to enter a passcode during the setup process. Then, when the setup was complete, your device now requires this code to be entered every time you use it.Having a passcode on your device does provide some added security that will keep someone from using your device without your permission. Additionally, if your device is lost or stolen, someone can not access the Settings on your device to disable the Find My iPhone features that allow you to locate the device and remotely wipe the data on the device.However, there are instances where someone may not want to have this level of security on their device. If you installed iOS 7 and now have to enter a code to use your device, it can easily be removed. Go to this link to learn how to turn on and off passcode.
After using an iCloud backup to restore or set up a device:
Your settings and accounts are restored from the iCloud backup you chose. Your device restarts and begins downloading your purchased music, movies, TV shows, apps, books, Camera Roll, and other content. If your device can’t download the version of an app that was backed up, it downloads the latest version.
Your purchased content is automatically downloaded from the iTunes Store, App Store, or iBooks Store based on iTunes in the Cloud availability by country. Previous purchases may be unavailable if they have been refunded or are no longer available in the store.
You may be asked to enter passwords for iTunes, App Store, and iBooks Store accounts to restore purchased items.
bars appear below Home screen icons for apps being downloaded.
To make an app a priority for downloading, tap its icon.
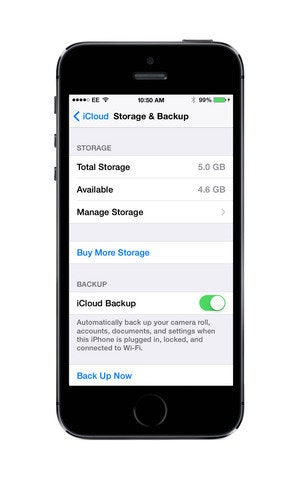
To check if the information on your device is fully restored, go to Settings > iCloud > Storage & Backup.
If you subscribe to iTunes Match, you can download your songs, albums, and playlists from iCloud after other information on your device is fully restored.
Note: You can restore information on your iOS device from an iTunes backup instead of an iCloud backup. For information, see the iTunes Help topic Back up your iPod touch, iPhone, or iPad.
To back up an iOS device to iCloud, you need to first turn on this feature.
Back up from a Mac: You can do this from iTunes when the device is connected to your Mac. Click the device’s name, then the Summarytab. In the Backups section, underAutomatically Back Up, choose theiCloud option. I recommend you check Encrypt iPhone Backup, because this will also store your passwords; you’ll need to enter a password to do this.
Back up from an iPhone or iPad:You can also turn on iCloud backups from your iOS device. Go to Settings > iCloud > Storage & Backup, then toggle the iCloud Backup switch on. As the above screenshot says, your device will automatically back up your camera roll, accounts, documents and settings content when it is plugged in, locked, and connected to Wi-Fi.
Back up manually: You may also want to back up your iOS device manually to iCloud, for instance when you’re on the road and haven’t backed up in a while or when you’ve been working away from a power source. To do this on your iOS device, tap Back Up Now just below the toggle switch; if you’re connected to Wi-Fi, your iOS device will back up.
Note that Apple says if you don’t back up your device for 180 days or more, the company will delete your device’s iCloud backup files.
Manage your backups
Say you’ve got a 64GB iPhone. How can you back up all that content to a 5GB iCloud account? You can’t, and you don’t. iCloud automatically backs up the following items:
Photos and videos in your Camera Roll
Device settings
App data
Home screen and app organization
iMessage, text (SMS), and MMS messages
Ringtones
Visual Voicemail
Apple also stores the most recent 1,000 photos from your Photo Stream, if that iCloud feature is turned on. (Go to Settings > iCloud > Photos and then toggleMy Photo Stream.) These images don’t count against your storage quota, but they will only remain in iCloud storage for 30 days, since you’re expected to download them to your computer. Set everything up right and this will happen automatically; check out our article “Up and running with Photo Stream" to learn the basics.
Also, your device won’t back up the music you sync, or the apps on your device. In fact, it doesn’t back up any media. Apple says that iOS devices back up “purchased music, movies, TV shows, apps, and books,” but what’s actually saved are links to those items in the iTunes Store, App Store, and iBookstore. None of that counts against your iCloud storage.
If you have to restore your iOS device from an iCloud backup, you’ll re-download those items from their respective stores. This means, of course, that you’ll save space. You will not, however, have backups of any non-purchased items. Hopefully, you have those on your Mac in your iTunes library.
Axe app backups that you don’t need
Can you download that digital magazine again? Is an app already backed up to Dropbox? If so, toggle off its iCloud backup here.
Since iCloud storage is limited, it pays to be choosy about what else your device backs up. On your iPhone or iPad, tap Settings > General > Usage and then scroll down to Manage Storage. All the devices associated with your Apple ID will appear here. Tap the one you’re interested in to see the date of its latest backup and the backup’s size. Under Backup Options, you can turn off backups for individual apps using the toggle buttons.
In the screenshot above, you can see that The Loop Magazine takes up 24MB of my iCloud storage space. Turning this option off saves about 10 percent of my total backup. Since I can easily re-download issues of this magazine, I don’t really need to back it up at all.
Scroll down the list, tap Show All Apps, and then turn off any apps that you don’t need backed up. For starters, look for apps that sync data to Dropbox or some other cloud service.
Back up wisely
iCloud backups are great, and can save your bacon in an emergency. If you use too much storage, you can always buy more: An additional 10GB costs $20 per year, an additional 20GB costs $40 per year, and an additional 50GB costs $100 per year. But before you do, check to see if you can trim some fat.
TypeInBraille allows you to write in Braille on your iPhone. You can enter a character through its Braille representation using a sequence of three simple gestures. Each gesture is used to enter one of the three rows of a braille character. $4.99
iBlink Radio The iBlink Radio application from Serotek Corporation is the world's first application for the visually impaired for the iPhone, iPod touch, and iPad! Radio stations, podcasts and reading services of special interest to blind and visually impaired persons; as well as their friends, family, caregiver Free To see more iPhone and iPad Apps For Blind And Visually Impaired please go to iPhone and iPad Apps For Blind And Visually Impaired or iPhone and iPad Apps for the Blind And Visually Impaired at Google+
Email forwarding can be a really useful tool and is very easy to set up in Gmail. This About.com video will provide tips on activating mail forwarding in Gmail.See Transcript
First, click the gear symbol in the top right corner of your inbox. In the drop-down menu that appears, click "Settings."
Near the top of the "Settings" page, click the tab that reads "Forwarding and POP/IMAP." Next, click "Add a forwarding address." In the box that appears, type in the email address to which you'd like your Gmail incoming messages forwarded; when finished, click "Next." Confirm that your address is correct, then click "Proceed."
The next box will notify you that a confirmation code has been sent to the email you've just added. Click "OK."
Confirm Email Forwarding
Login to the email address you provided and open the email from "Gmail Team." The subject line will read "Gmail Forwarding Confirmation." Next, click the link provided in the email to confirm your request.
If for some reason you cannot open the link, highlight and copy the 8-part confirmation code. You can use this code to confirm your request by following the instructions provided in the email.
Activate Forwarding in Gmail
When mail forwarding has been confirmed, log back into your original address and click on the gear symbol. In the drop down menu that appears, click "Settings." Next, click the "Forwarding and POP/IMAP" tab. Then click the circle next to the sentence that reads "Forward a copy of incoming mail to my email address." This will enable email forwarding. Finally click "Save Changes" at the bottom. Choose how Gmail should handle forwarded messages. Select
keep Gmail's copy in the Inbox to have Gmail leave the message in your Gmail Inbox as new and unread.
archive Gmail's copy (probably the most useful setting) to make Gmail mark forwarded messages as read and remove them from the Inbox, but keep them in the archive for later search and retrieval.
trash Gmail's copy to move message to the Trash after they have been forwarded. Trashed messages will be deleted automatically after 30 days.
BigMagnifyTurn your iPhone into a Magnifying glass! Magnifier grate for visually impaired people. Have you ever wanted to look at something and see more detell now you can with BigMagnify. Great for those who have lowVision. Free
 Text Detective is a fully accessible app that reads text from the camera in your iPhone, iPod Touch or iPad within seconds. Point the camera and sort through mail, read menus, cards, product packages, medication labels, $9.99